Getting into 3D
Adobe Dimensions – an often overlooked 3D design tool
If you’ve designed for awhile you’ll know, the better the mockup the easier it is for your client to visualize and get excited about the project.
I used Adobe Dimensions right after it was introduced in the late 1990’s as a packaging designer for toys. It was a fabulous concept, but a horrible product at that time. So I avoided it for years, until I started noticing off-shore designers use this regularly – and for good reason – it creates photo-quality renderings of your design on packaging, print, and more.
Since that time I use Adobe Dimensions for many types of projects. It renders better than CAD, and you can pop backgrounds and surfaces in with amazing realism. You can also take advantage of cool camera angles, and save the angles for future image renders.
Unlike a photo shoot, it’s very easy to change lighting, backgrounds, and rotate the image. The images are stunning – especially when combined with photographic backgrounds and surfaces.
This would be idea for portals requiring different sides to be photographed for Amazon or big box store plan-o-grams, for example. It’s that accurate!
I use Dimensions for more than mockups, however. When new products need to be advertised, but they’re still not physically available for photographing, Dimensions allows you to create your own 3D models via Adobe Illustrator and Photoshop. You can then import these, add surfaces and place graphics on them.
Dimensions has been an invaluable tool – now that Adobe has updated it. A standard iMac with 16gb can process great images, so you don’t need a massive amount of RAM or processing power to create cool images.
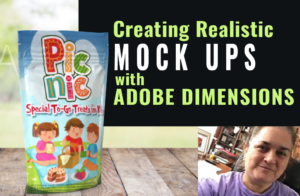
I created a quick video here to show how the above rought mockup was made. This is just a very quick mockup using Adobe Stock art and a background, but it shows the general process of using Adobe Dimensions.
Below are examples of images created with Adobe Dimensions.


Recent Comments